How to Make a Table Fan: Quick Steps
Nothing beats the satisfaction of building your own cooling device. Whether you need a backup fan for power outages, a science project for school, or a custom breeze machine for your desk, knowing how to make a table fan gives you a cost-effective and customizable solution. This guide covers everything from basic cardboard models to advanced solar-powered units, so you can build the perfect fan for your needs.
Choose Your Fan Type Based on Purpose

Before gathering materials, decide which fan type matches your skill level and intended use.
High-Efficiency DC Motor Fan
This version works best for bedrooms, offices, or off-grid setups. It uses a 12V DC motor running at 100 to 200 RPM, powered by a battery or solar panel. The fan consumes up to 70% less power than standard AC models while delivering comparable airflow. Use plastic or aluminum blades measuring 15 to 20 cm in diameter for long-term reliability.
Cardboard STEM Project Fan
Perfect for classrooms and home learning, this fan uses a 3V to 6V DC motor with thick cardboard blades. It teaches basic circuits, airflow dynamics, and engineering principles in a safe, low-cost way. Power it with a 4.5V or 9V battery pack, and let students explore how blade shape affects breeze strength.
Mini Manual or Electric Fan
This quick-build project uses a paperclip stand, thumbtack axle, and 9V battery. Great for young learners, it demonstrates basic mechanics without complex wiring. The fan can be manually spun or briefly powered for short demonstrations.
Gather Required Materials and Tools
Having the right components before starting prevents mid-project delays.
Core Components for High-Efficiency Fan
• 12V DC brushless motor (100 to 200 RPM)
• 12V Li-ion battery or 12V 2A adapter
• Plastic or aluminum blades (15 to 20 cm diameter)
• Metal or plastic base with mounting bracket
• Rubber washers, hub adapter, and screws
• Toggle switch and 1A inline fuse
Core Components for Cardboard Fan
• 3V to 6V DC motor
• 4.5V or 9V battery pack
• Stiff cardboard (cereal boxes work well)
• Hot glue gun and scissors
• Wooden skewer for the axle
Essential Tools
• Scissors or box cutter
• Hot glue gun or strong adhesive
• Soldering iron for permanent wiring
• Electrical tape or terminal blocks
• Drill for precise axle holes
• Pliers, screwdriver, and ruler
Cut and Balance the Blades Properly

Blade quality directly affects airflow and noise level. Take time to get this step right.
Design Aerodynamic Blade Shapes
Draw 3 to 4 identical blade shapes on your chosen material. Taper each blade from base to tip and add a slight curve for better airflow. For cardboard, reinforce edges with tape to prevent warping after cutting.
Balance the Blade Assembly
Unbalanced blades cause wobbling and excessive noise. Test balance by spinning the blade set gently on a pencil tip. If one side dips lower, add a small piece of tape to the lighter side. Repeat until rotation stays smooth and level.
Build a Stable Base for Your Fan

The base keeps your fan upright during operation. Stability matters more than complexity.
Cardboard Base Construction
Cut a 15 cm by 15 cm square for the foundation. Attach an 8 cm by 8 cm vertical support platform using folded cardboard strips in triangular braces. Reinforce all joints with hot glue or tape. This design prevents tipping during operation.
Heavy-Duty Base for DC Motors
Use a metal or thick plastic base for 12V fans. Mount the motor bracket with screws and place the battery pack at the rear to lower the center of gravity. Always ensure the motor shaft sits horizontal and perpendicular to the base.
Mount the Motor Securely
Proper motor mounting prevents vibration transfer and extends component life.
Position for Smooth Rotation
Place the motor on the support platform so the shaft extends freely beyond the edge. For oscillating fans, install a ball bearing or swivel joint on the base and attach the motor to a rotating platform.
Fasten Without Vibration
Use screws and brackets for metal bases. Apply hot glue or strong adhesive for cardboard builds. Add rubber washers between the motor and base to dampen vibration, which significantly reduces operational noise.
Install Oscillation Mechanism
For 360-degree rotation, fix a center pin to the base. Attach the motor platform to a pivoting joint. Add a screw clamp to lock the direction when oscillation is not needed. Test manually to ensure friction-free movement.
Wire the Electrical Circuit Safely
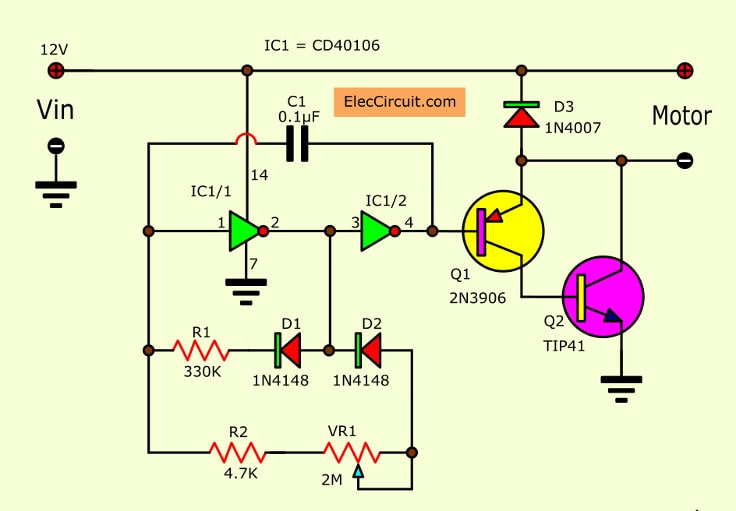
Electrical work requires attention to polarity and safety features.
Connect Power Correctly
Identify the motor positive and negative terminals. Match them exactly to the battery or adapter terminals. Reversing polarity can permanently damage the motor, so double-check before powering on.
Add Basic Controls
Insert a toggle switch in the positive wire line. Cut the wire, strip the ends, and connect to switch terminals. Use soldering for permanent setups or electrical tape for temporary builds.
Install Speed Control
Connect a PWM controller between the power source and motor for adjustable speed. This allows smooth speed changes without motor overheating. Wire the input to the battery, output to the motor, and attach the control knob for easy adjustment.
Test and Optimize Fan Performance
Testing reveals issues before they become permanent problems.
First Power-Up
Connect the battery or adapter. The blades should spin immediately. If not, check polarity, verify all connections, and test battery charge with a multimeter.
Fix Common Issues
If the fan wobbles, rebalance the blades or tighten the motor mount. For loud grinding noise, lubricate the pivot joint and check for blade obstructions. Weak airflow usually means the blade angle needs adjustment to 15 to 30 degrees.
Maximize Airflow
Adjust blade angle to 15 to 30 degrees using a protractor or visual estimate. Too flat creates weak breeze, while too steep causes drag and noise. Ensure blades clear the base and motor housing completely.
Maintain Your DIY Fan for Long-Term Use
Regular maintenance keeps your fan running efficiently for years.
Weekly Care
Wipe blades with a damp cloth to remove dust buildup. Dust throws off balance and reduces airflow significantly. For cardboard blades, use a dry brush instead of water to prevent damage.
Monthly Maintenance
Apply a drop of light machine oil to pivot points and bearings every 2 to 3 months. This ensures smooth oscillation and prevents mechanical wear. Check all wire connections for looseness or corrosion.
Proper Storage
Store the fan in a dry location away from moisture. Remove batteries during long storage periods to prevent leakage and corrosion damage.
Troubleshoot Common Fan Problems
Knowing how to diagnose issues saves time and frustration.
Fan Doesn’t Spin
Dead batteries, broken wires, or reversed polarity typically cause this problem. Replace the battery, re-solder loose connections, or reverse the wire connections to fix it.
Weak Airflow
Low voltage, dull blades, or wrong blade angle reduce airflow. Charge the battery, sharpen or replace blades, and adjust the tilt to approximately 25 degrees for optimal performance.
Motor Overheats
Voltage mismatch, blocked vents, or continuous use cause overheating. Confirm the input voltage matches the motor rating, clean any debris from motor vents, and allow cooling periods during extended operation.
Loud Grinding Noise
Friction in the pivot joint or unbalanced blades creates grinding sounds. Lubricate the swivel joint, rebalance the blades, and check for foreign objects in the rotation path.
Upgrade to Smart or Solar Power
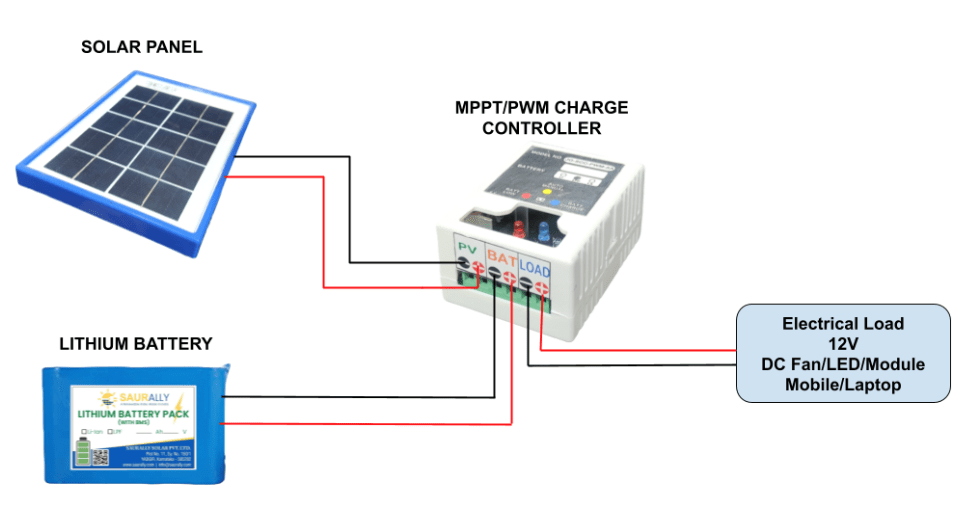
Advanced features transform a basic fan into a sophisticated cooling system.
Add Remote Control
Wire a Bluetooth module to the PWM controller. Pair with a smartphone app to adjust speed from across the room. This works perfectly for bedside or desk use.
Automate with Temperature
Use an Arduino with a DHT11 temperature sensor to auto-start the fan when room temperature exceeds 25 degrees Celsius. Simple code examples are widely available online.
Go Solar-Powered
Connect a 12V solar panel (10 to 20W) to a charge controller, then link to a 12V Li-ion battery pack. This setup charges during daylight and powers the fan at night, ideal for outages or camping.
Why DIY Fans Outperform Store-Bought Models
Building your own fan offers advantages commercial products cannot match.
Energy Efficiency
DIY DC fans use up to 70% less power than standard AC models. A 12V fan draws only 10 to 15 watts, making it perfect for solar or battery backup power.
Complete Customization
Paint the base any color, shape unique blades, add LED lights, or program smart automation features. No commercial fan offers this level of personalization.
Repairable and Sustainable
Replace a motor or battery instead of discarding the entire unit. Use recycled materials like cardboard, paperclips, and old batteries to minimize e-waste.
Lower Cost
A high-performance DIY fan costs under $20 with reused parts. Commercial smart fans often exceed $100 for similar functionality.
Frequently Asked Questions About Making Table Fans
What voltage motor is best for a DIY table fan?
For safe indoor use, a 12V DC motor running at 100 to 200 RPM works best. Use 3V to 6V motors for educational projects with children.
How do I make my fan more powerful?
Increase blade size, adjust blade angle to 25 degrees, and ensure the motor receives full rated voltage. Balanced blades with smooth edges also significantly improve airflow.
Can I power a table fan with solar panels?
Yes. Connect a 12V solar panel to a charge controller, then to a 12V battery. This powers your fan day or night with clean energy.
Why does my DIY fan wobble?
Unbalanced blades cause wobbling. Re-cut blades to be identical in weight and shape, or add small counterweights to lighter sides until rotation stays smooth.
How can I make my fan quieter?
Add rubber washers between the motor and base to dampen vibration. Lubricate pivot points regularly and ensure blades are properly balanced.
Key Takeaways for Building Your Own Table Fan
Building a table fan teaches valuable skills in engineering, electronics, and sustainability. Start with a simple cardboard model to understand basic mechanics, then progress to DC motor fans with PWM controls and smart features. Focus on blade balance, secure motor mounting, and proper wiring with inline fuses for safety. Whether you need a backup cooling solution for outages, a STEM project for school, or a custom solar-powered desk fan, the principles remain the same. Choose your materials based on skill level, test frequently during assembly, and maintain the fan regularly for years of reliable operation. Your DIY fan will outperform many commercial options while costing significantly less and remaining fully repairable.