How to Fix Honeywell Tower Fan Not Blowing Air
Your Honeywell tower fan is on, but no cool breeze comes out. The lights might be flashing, the motor could be humming, or the unit may not respond at all. A Honeywell tower fan not blowing air is a common issue, and the fix is often simple and inexpensive. Whether it is a seized bearing, a blown capacitor, or just dust-clogged blades, most problems can be diagnosed and resolved in under 30 minutes without replacing the entire unit.
This guide walks you through every possible cause, from power failures to mechanical lock-ups, with clear steps to identify and fix your fan. You will learn how to test components, clean critical parts, and replace key elements like capacitors or fuses, all using affordable tools.
Verify Power and Outlet Connection
Before disassembling your fan, confirm it is receiving power. This simple step saves time by ruling out external power issues first.
Test the Outlet First
Plug a different device into the same outlet, such as a lamp or phone charger. If the device does not power on, the issue is not the fan. Try a different circuit or reset the circuit breaker.
Inspect the Power Cord
Examine the entire length of the cord for cuts, kinks, or burns. A frayed wire can interrupt power flow. Gently bend the cord near the plug and fan base while the unit is on. If the fan flickers or starts briefly, internal wire damage is likely.
Confirm Proper Plug Connection
Ensure the plug is fully seated in both the wall and the fan base. Some models have loose internal connectors that fail over time. Wiggle the connection point to check for intermittent power.
Diagnose Complete Power Failure

If the fan shows no lights, sounds, or movement, the problem lies in the power delivery system. Follow these steps to identify the exact cause.
Check for a Blown Internal Fuse
Some Honeywell models include a small internal fuse near the power input on the back panel. Unplug the fan and open the back housing by removing screws or prying off plastic tabs carefully. Locate the fuse near the power terminal block and inspect it visually for a broken filament or darkened glass. Replace with an identical fuse, typically 3 to 5 amp, which costs about $2 to $3.
Replace a Failed Capacitor
A dead or weak capacitor is a leading cause of total fan failure. Symptoms include no startup, a faint hum, or delayed start. The common replacement specification is 50µF/450V, and the part costs $2 to $6.
To replace the capacitor, unplug the fan and open the housing. Locate the cylindrical component connected to the motor. Take a photo of the wiring before disconnecting anything. Desolder or unclip the old capacitor terminals, then install the new one, matching polarity and terminals exactly. Reassemble and test the fan.
Capacitors store electrical charge even when unplugged. Discharge by shorting the terminals with an insulated screwdriver after unplugging the fan.
Fix Seized Bearings and Mechanical Lock-Ups
If the fan hums but the blades do not turn, the motor shaft is likely locked due to seized bearings. This is especially common in models like the HYF013W.
Perform a Manual Spin Test
Unplug the fan and try spinning the blades by hand. Smooth rotation indicates the motor may be fine. Stiff or frozen movement confirms a seized bearing. If the blade spins slightly then stops abruptly, dried lubricant is the culprit.
Clean and Lubricate the Bearing
Gather these tools before starting the repair. You will need a screwdriver, a red cleaner-lubricant spray like CRC or WD-40 Specialist Electrical Contact Cleaner, high-performance motor lubricant like 3M Novec or Lubriplate, and a lint-free cloth.
Remove the base screws, which are often hidden under rubber feet or plastic plugs. Carefully separate the housing, avoiding cracking plastic tabs. Locate the top bearing, which supports the shaft end and is most prone to failure. Spray cleaner into the bearing gap to dissolve old grease, then wipe residue with a cloth. Apply 1 to 2 drops of motor-specific lubricant. Reassemble and test.
Never use standard WD-40, cooking oil, or silicone spray, as these degrade under heat and attract dust. A single drop of oil in the motor housing cavity improves long-term performance.
Clear Airflow Blockages and Obstructions
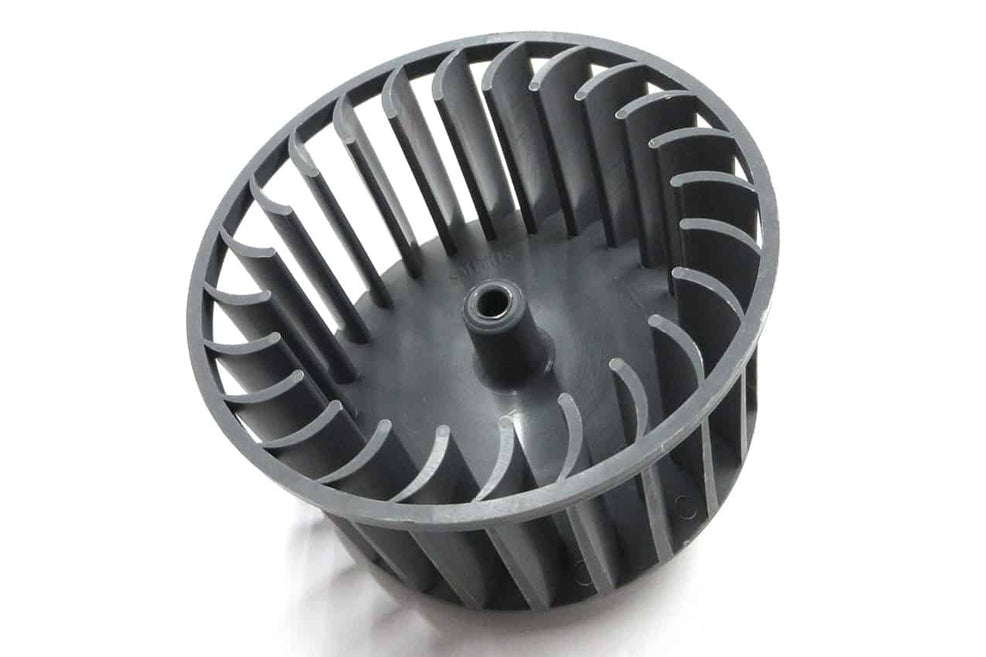
Even if the motor runs, obstructions prevent air from moving. Blocked intake reduces efficiency even if the fan appears to run normally.
Inspect Fan Blades and Grilles
Remove the front grille, which usually attaches with clips or screws. Examine the blades for dust, hair, or debris. Clean with a soft brush or damp cloth, but never soak electrical components. Check the rear intake vents for clogs and vacuum them with a brush attachment.
Check Squirrel Cage Alignment
In tower fans, air is moved by a squirrel cage inside the column. If the motor runs but there is zero airflow, the cage may have detached from the motor shaft. Open the housing and verify the cage is fully seated on the shaft. If it is loose, reseat it firmly. If damaged, order a replacement from Honeywell.
This issue is common in HY-108 units after 1 to 2 years of use.
Resolve Loose or Stripped Blades

A blade that spins freely on the shaft will not push air. This is a common issue that is easy to diagnose and fix.
Inspect Blade Attachment
Look at the center hub where the blade connects to the motor shaft. Check whether the setscrew is loose, the keyway is stripped, or the blade wobbles when the motor runs.
Tighten or Replace the Blade
Use a small Allen wrench to tighten the setscrew. If the threads are stripped, the blade assembly must be replaced. Order an OEM part using your model number, such as a HY-108 blade kit.
A drop of thread-locker can secure a loose screw, but avoid glue, which prevents future maintenance.
Test and Repair Control Systems
Sometimes the fan works, but the controls fail, making it seem like the fan is not blowing air. Test both the front panel and remote to isolate the issue.
Fix Front Panel Button Failures
Remove the control panel by unscrewing or unclipping it. Use compressed air or a cotton swab with isopropyl alcohol to clean stuck buttons. Let the panel dry completely before reattaching. If buttons remain unresponsive, the PCB may be damaged, and replacement boards are available online for $10 to $15.
Troubleshoot Remote Control Issues
Replace the remote batteries first. Ensure there is a clear line of sight to the IR receiver on the fan. Test the remote with your phone camera by pointing it at the screen and pressing a button. If no flashing light appears, the remote is dead. If the receiver light works but the fan does not respond, the internal IR board may need replacement.
Use the front panel as a backup while sourcing a new remote.
Fix Oscillation Without Airflow
The fan blows air but does not swing? Oscillation failure is separate from airflow issues, but both problems should be addressed.
Inspect Oscillation Components
Ensure nothing blocks the base rotation path, such as furniture, cords, or rugs. Open the base housing and look for broken plastic gears or worn teeth. Test the oscillation motor by applying 3V from an AA battery; it should twitch. Replace the motor if it is faulty, typically an $8 to $12 part.
You can disable oscillation and still use the fan if the primary airflow is restored.
Model-Specific Diagnostic Solutions

Targeted solutions based on common failure patterns help you fix your specific model quickly.
HY-108: Running But No Airflow
The likely cause is a detached squirrel cage or loose blade. Open the column and reseat the blower wheel on the shaft. Tighten the blade setscrew and clean the internal ducts.
HYF013W: Humming With No Spin
The root cause is a seized top bearing from dried lubricant. Disassemble carefully, as plastic tabs break easily. Clean the shaft and bearing with a red cleaner, lubricate with 3M Motor Lubricant, and reassemble with care.
HY-254-TGT: Slow or Jerky Rotation
Possible causes include blade obstruction, a failing oscillation motor, or low capacitor charge. Manually spin the blade to test for stiffness. Clean and lubricate if needed. Test the capacitor with a multimeter and replace the oscillation motor if necessary.
Prevent Future Fan Failures
Extend your fan is life with smart maintenance practices that take just a few minutes per session.
Establish a Cleaning Schedule
Wipe grilles weekly with a dry or slightly damp cloth. Deep clean blades and internals every 3 to 6 months. Use a vacuum with a brush attachment for vents and hard-to-reach areas.
Avoid Overheating and Improper Use
Do not run the fan continuously for days without breaks. Keep the unit away from heat sources like radiators or direct sunlight. Allow the fan to rest periodically during extended use.
Lubricate Proactively
Even if the fan runs smoothly, apply motor lubricant every 12 to 18 months, especially in dusty or hot environments. Never oil the fan while it is plugged in or warm.
When to Repair Versus Replace
Understanding when to repair and when to replace saves money and frustration.
Repair the Fan If the issue is a capacitor, fuse, or bearing-related problem. Repair is worth it if the cost of parts is under $15. The motor should make some sound, such as a hum or buzz. Repair is also appropriate if you are comfortable with basic tools.
Replace the Fan If the motor coil is burnt, which produces a burnt smell and visible charring. Replace if the housing is cracked beyond repair. Consider replacement if a new energy-efficient fan costs less than $40.
The cost insight here is significant. Repairing a capacitor for $5 or a bearing for essentially nothing saves over 80% compared to buying a new fan.
Frequently Asked Questions About Honeywell Tower Fan Not Blowing Air
Why does my Honeywell tower fan turn on but not blow air?
This usually indicates a mechanical disconnect between the motor and airflow components. Common causes include a detached squirrel cage, loose blade attachment, or severe dust obstruction inside the unit. Open the housing and check that the blower wheel is seated properly on the shaft.
How do I know if my fan capacitor is bad?
A bad capacitor causes no startup, a faint hum, or delayed start. The fan may also make no noise at all. You can test it with a multimeter set to capacitance mode, or simply replace the 50µF/450V capacitor, which costs only $2 to $6.
Can I fix a seized bearing myself?
Yes, seized bearings are a common DIY repair. Unplug the fan, disassemble the housing, spray a cleaner-lubricant into the bearing gap to dissolve old grease, wipe clean, and apply motor-specific lubricant. The repair takes about 20 minutes.
What should I do if my fan makes a humming sound but the blades do not spin?
This indicates power is reaching the motor but mechanical resistance is preventing rotation. The most likely cause is a seized bearing from dried lubricant. Perform a manual spin test to confirm, then clean and lubricate the bearing.
How much does it cost to repair a Honeywell tower fan versus buying a new one?
Most repairs cost under $15 for parts like capacitors, fuses, or lubricant. A new Honey Honeywell tower fan typically costs $40 or more. Repairing is economically smarter unless the motor is burnt out or the housing is severely damaged.
How often should I clean my tower fan to prevent airflow problems?
Clean the exterior grilles weekly and perform a deep clean of the blades and internals every 3 to 6 months. Regular maintenance prevents dust buildup that restricts airflow and causes mechanical strain.
Key Takeaways for Fixing Your Honeywell Tower Fan Not Blowing Air

A Honeywell tower fan not blowing air is rarely a death sentence. Most fixes take under 30 minutes and cost less than $10. Start with power checks by testing the outlet, cord, and plug connection. Move to mechanical inspection if power is confirmed. Clean dust from blades and vents, lubricate seized bearings with motor-specific oil, and replace faulty capacitors or fuses. Keep this guide handy for seasonal maintenance and extend your fan is life for years.