How to Assemble a Table Fan: Quick Steps
Putting together a table fan shouldn’t feel like solving a puzzle. Yet, with missing screws, confusing parts, and vague instructions, many users struggle through the process, only to end up with a wobbly, noisy fan that cuts cooling efficiency. The good news is that most table and pedestal fans follow a consistent assembly logic: secure the base, mount the motor, attach the blades and grills correctly, and test for smooth operation. This guide cuts through the confusion using real model-specific insights to give you a foolproof method for assembling any table fan quickly, safely, and correctly.
You will learn how to identify every component, avoid common mistakes like over-tightening plastic nuts, and understand critical details such as reverse-threaded blade caps that lock when turned counterclockwise. Whether you are setting up a compact desktop model or a tall pedestal unit, this step-by-step walkthrough ensures your fan runs quietly, safely, and efficiently without a single wobble.
Prepare Your Workspace and Tools
Before touching any parts, set the stage for success. A cluttered or uneven surface increases the risk of losing small hardware or damaging components during assembly.
Clear, Flat Surface Required
Choose a clean, flat area large enough to lay out all components. Avoid carpeted floors because small screws can vanish easily into the fibers. A kitchen table or hard floor works best. Keep pets and children away to prevent accidental ingestion of small parts.
Safety First: Unplug and Inspect
Never plug in the fan during assembly. Even if the fan is not powered, testing while assembling creates electrical hazards. Also, inspect all parts for cracks, warping, or damage. Do not use the fan if any component, especially the motor housing or grills, is compromised.
Gather Essential Tools
While many fans are tool-free, have these on hand:
- Phillips screwdriver
- Hex key (if included)
- Small container for screws to avoid loss
Check the hardware packet against the manual. Missing a washer or L-shaped nut? Stop and contact the manufacturer before proceeding.
Identify All Components
Misidentifying parts leads to incorrect assembly. Use this universal breakdown to match what is in your box.
Core Parts Checklist
Every table or pedestal fan includes these key elements:
- Motor housing (contains the motor and shaft)
- Base (flat cover or crossbar legs)
- Front and rear grills (protective cages)
- Fan blade (impeller)
- Blade cap or spinner
- Mounting screws, bolts, washers, plastic nuts
Pedestal models add:
- Vertical pole (extension shaft)
- Height adjustment collar
- Locking knob or clamp
- Optional control panel (wired separately)
Spot Model-Specific Features
Refer to your model manual for specific details. Status 12 Inch models have a decorative center ring and snap-fit base. Bajaj Media BT07 uses a clamp system and assembles in under 4 minutes. Swan Pedestal fans feature a five-blade design with timer settings ranging from 30 to 120 minutes. If your hardware does not match the list, do not proceed. Verify with the manual or contact manufacturer support.
Assemble the Base
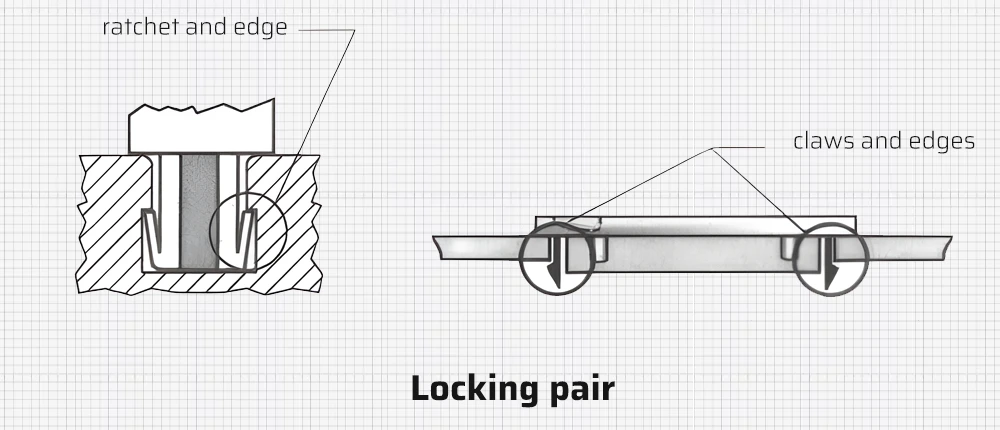
The base is the foundation. An unstable base means a wobbling fan, even if everything else is perfect.
Table Fan Base: Snap and Lock
For models with a snap-fit base:
- Locate the notch on the base cover.
- Align it with the snap on the motor head.
- Press down firmly until you hear a click.
- Rotate the locking nut underneath 90 degrees clockwise to secure.
Ensure the motor head sits flush. If it wiggles, reseat and relock.
Pedestal Fan Base: Secure Crossbars or Segments
Pedestal bases often come in pieces:
- Gently squeeze the legs together.
- Insert them into the central hub until they click.
- Lay the base flat. No leg should lift off the ground.
For screw-based models:
- Align base segments.
- Insert provided screws.
- Tighten evenly with a screwdriver to prevent warping.
Add Base Cover (If Included)
Some models include a plastic cover to hide screws:
- Slide or hook it over the base.
- Ensure it lies flat and does not interfere with stability.
Attach the Pole (Pedestal Models Only)
If you are assembling a standing fan, the pole connects the base to the motor head.
Insert and Secure the Extension Pole
- Align the pole with the central socket in the base.
- Push down until fully seated.
- From underneath, insert a large screw and washer into the mounting hole.
- Tighten securely with a screwdriver.
For models with four bolts:
- Place washers on each bolt.
- Insert through base and pole.
- Tighten all four evenly to prevent misalignment.
Install Height Adjustment Collar
- Slide the adjustment cap onto the pole.
- Loosen the side locking screw to allow movement.
- Raise or lower the cap to desired height.
- Retighten the screw until resistance is felt. Do not overtighten.
This collar will later support the motor head.
Mount the Motor Head
The motor head drives the fan. It must be stable and correctly aligned.
Align and Insert the Motor Unit
For models with a slot and pin system:
- Find the central slot on the base.
- Match it with the pin on the motor unit.
- Press down until snug.
For generic pedestal models:
- Loosen the knob or clamp on the motor head.
- Slide it onto the extended pole.
- Push down firmly until fully seated.
- Retighten the knob to lock.
Secure with Mounting Hardware
Some models require screws:
- Align motor housing with mounting holes.
- Insert screws through the base or pole.
- Tighten evenly to keep the head level.
Tilt the head slightly up or down to confirm it moves smoothly. If stiff, check for obstructions.
Install the Rear Grill
The rear grill holds the blade assembly and protects the motor.
Align and Fasten the Back Cage
For standard models:
- Remove temporary plastic nut from motor shaft.
- Align two holes on the rear grill with positioning pins.
- Slide on the plastic grill nut and tighten clockwise.
For 16-inch pedestal models:
- Insert tabs on the grill into motor receptacles.
- Screw on the L-shaped plastic nut by hand.
- Tighten until firm. Do not over-tighten.
For generic models:
- Slide back housing onto shaft.
- Align with two slots.
- Push until a click is heard.
- Reattach threaded cover by hand until resistance.
Warning: Over-tightening warps plastic housings. Hand-tight is sufficient.
Mount the Fan Blade
This is the most critical step. A poorly mounted blade causes noise, vibration, and motor strain.
Align Blade with Motor Shaft
All fans use a pin and slot system:
- Locate the metal pin on the motor shaft.
- Align the shaft slot on the blade hub with the pin.
- Slide the blade straight onto the shaft until fully seated.
Verify:
- The pin is fully inside the slot.
- No gap between blade hub and motor.
For Swan models, align two blade halves first, then push onto shaft.
Secure with Blade Cap (Reverse Thread)
This is where most people make a mistake.
The blade cap, spinner, or nut is reverse-threaded. It tightens counterclockwise. Why? Because the fan spins clockwise during operation. A standard thread would loosen over time.
Correct tightening steps:
- Slide the cap over the shaft.
- Turn it counterclockwise by hand.
- Tighten firmly until resistance is felt.
Do not use tools. Finger-tight is enough.
Pro Tip: Mark the cap position with tape before removal. This helps during cleaning.
Attach the Front Grill
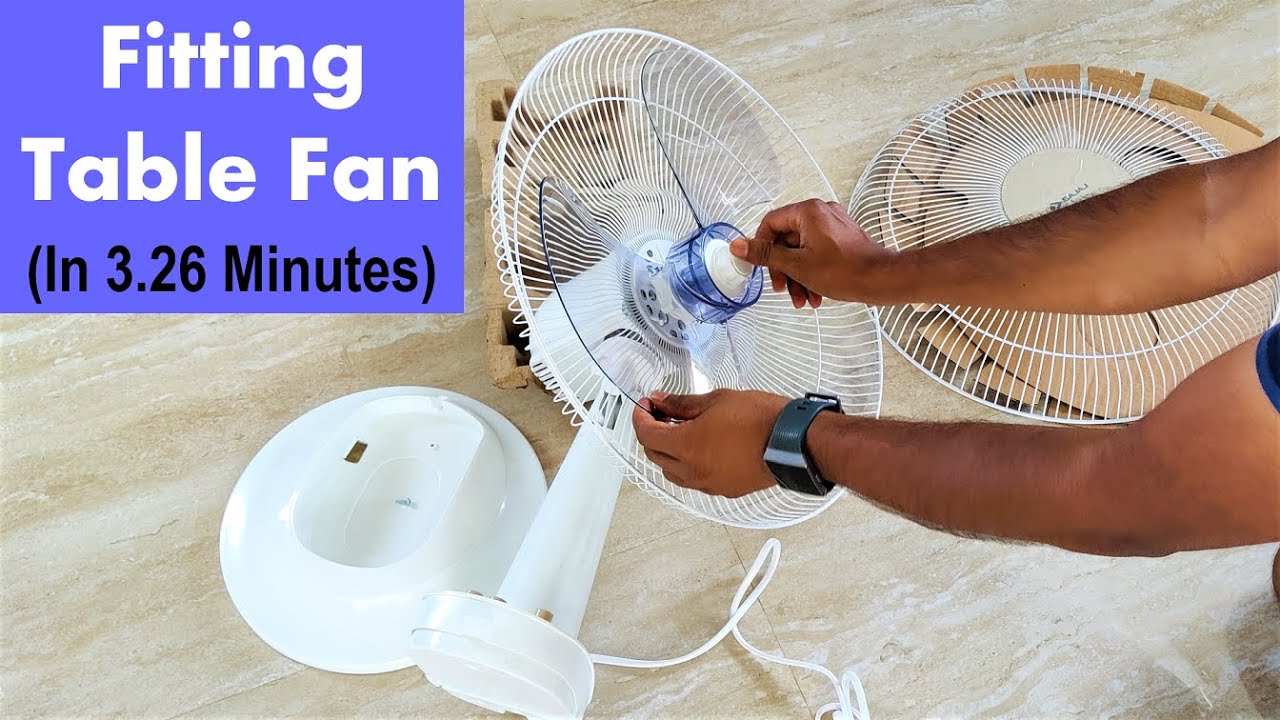
The front grill completes the safety cage. Never operate the fan without both grills.
Clip and Screw Systems Compared
Hybrid systems:
- Place decorative ring in center.
- Turn fan upside down.
- Insert and tighten center screw.
- Align front grill with rear grill.
- Hook top clip first.
- Close side clamps evenly.
- Insert and tighten bottom screw.
Clamp systems:
- Align clamp slots with back guard and front edge.
- Place front guard into clamp with label facing outward.
- Tighten screw until fixed.
Safety screw method:
- Insert safety screw through front and back holes.
- Add nut but leave loose.
- Snap all four perimeter tabs until they click.
- Finally, tighten safety screw just enough to hold. Do not compress the back plate.
Connect Controls and Power (If Applicable)
Some models have separate control panels or wiring.
Wire the Control Panel
- Route wires from switch through the base.
- Connect to motor terminals as per diagram.
- Match wire colors or labels.
- Ensure connections are snug and insulated.
Test Timer and Switch Functions
- Set timer to various settings if available.
- Pull switch to test stop rotation.
- Test all speed settings (Low, Med, High).
Test Operation and Adjust Settings

Final step: power up and verify performance.
Initial Power-On Test
- Plug fan into outlet.
- Turn on at lowest speed.
- Listen for:
- Unusual grinding or scraping (loose blade or misalignment)
- Excessive vibration (wobbly base or unseated motor)
- No airflow (blade not spinning)
If issues arise, turn off immediately and recheck blade seating and grill tightness.
Verify Speed and Stability
- Cycle through all speed settings.
- Confirm motor responds smoothly.
- Check that fan remains upright on flat surface.
Set Oscillation and Tilt
Direct airflow where you need it.
Enable Oscillation
- Press oscillation knob on motor head.
- Push top tab down to unlock swivel.
- Pull up to lock.
Watch the fan sweep side to side. Motion should be smooth.
Adjust Tilt Angle
- Hold the motor head.
- Tilt up or down manually.
- For models with a side lever, release it to adjust, then lock.
Some pedestal fans allow inner pole height adjustment:
- Turn collar anti-clockwise to loosen.
- Slide pole.
- Turn clockwise to fix.
Maintenance and Safety Tips
Keep your fan running safely and efficiently.
Clean Every 2-3 Weeks
During summer:
- Unplug the fan.
- Remove front and rear grills.
- Wipe blades and grills with a damp cloth.
- Dry completely before reassembly.
Avoid spraying water directly on the motor.
Prevent Wobbling
Check monthly:
- Blade alignment
- Tightness of blade cap and safety screw
- Base stability on floor
Critical Safety Rules
- Never run the fan without both grills. This is a serious child safety hazard.
- Keep away from water and wet hands.
- Do not force parts. Misalignment damages the motor.
- Avoid over-tightening plastic screws. They strip easily.
Troubleshoot Common Issues
Fix problems fast.
Fan Wobbles
Check:
- Base is on flat surface
- All screws and nuts are tight
- Blade is fully seated on shaft
- Motor head is securely mounted
No Power
Verify:
- Plug is in outlet
- Switch is on
- Wiring is connected (for separate panels)
- Fuse is intact
Unusual Noise
Inspect for:
- Loose blade cap
- Bent or unbalanced blade
- Foreign object in grills
- Motor shaft pin not fully engaged
Oscillation Not Working
Ensure:
- Oscillation knob or clip is pressed down
- No obstruction in swivel mechanism
- Locking tab is not engaged
Key Takeaways for Assembling Your Table Fan
Assembling a table fan does not have to be frustrating. By following this clear, model-agnostic guide, you have secured a stable base, mounted the motor correctly, attached the blade with the proper counterclockwise-tightened cap, and locked both grills in place. Your fan should now deliver quiet, wobble-free cooling with full oscillation and tilt control.
Remember to clean the fan every 2 to 3 weeks during summer, never operate without both grills, and store disassembled in winter. With proper care, your fan will last for years. Models like the Bajaj Media BT07 come with a two-year warranty for added peace of mind.
Now plug it in, set your preferred speed, and enjoy the breeze.
Frequently Asked Questions About Assembling a Table Fan
How long does it take to assemble a table fan?
Most table fans can be assembled in 10-15 minutes. Pedestal fans may take 20-30 minutes due to additional pole components. Models like the Bajaj Media BT07 specifically note tool-free assembly in under 4 minutes.
What tools do I need to assemble a table fan?
Most modern table fans are designed for tool-free assembly. However, having a Phillips screwdriver and potentially a hex key on hand is recommended for specific locking mechanisms or if your model requires screw-based assembly.
Why does the blade cap turn counterclockwise?
The blade cap uses reverse threading because the fan blade spins clockwise during operation. A standard thread would loosen over time due to the rotation. Turning counterclockwise tightens and locks the blade securely.
Can I operate my table fan without the front grill?
No. Never operate a fan without both front and rear grills installed. This is a critical child safety feature that prevents fingers and objects from reaching the spinning blades.
How do I stop my table fan from wobbling?
Check that the base is on a flat surface, all screws and nuts are tight, the blade is fully seated on the shaft, and the motor head is securely mounted. Regular maintenance checks help prevent wobbling issues.
How often should I clean my table fan?
Clean your table fan every 2 to 3 weeks during summer usage. Dust buildup on blades and grills compromises performance and airflow efficiency. Always unplug before cleaning.