How to Fix Mini Cooper Fan Not Turning On
Your Mini Cooper’s engine is overheating, the A/C isn’t cooling, and you realize the radiator fan isn’t turning on. This is more than just an annoyance. Without proper airflow, your engine risks severe damage from excessive heat, especially in traffic or hot weather. The good news? Most causes of a Mini Cooper fan not turning on are diagnosable and repairable with basic tools and logical troubleshooting.
We’ll walk through the fan’s two-stage operation, pinpoint the most common failure points like the low-speed resistor and non-standard relays, and show you how to test each component. You’ll learn how to bypass relays, verify DME signals, and even command fan stages using a scan tool. No guesswork. No wasted parts.
How the Mini Cooper Fan System Works

Two-Stage Cooling Explained
The Mini Cooper uses a dual-speed electric radiator fan to manage engine temperature efficiently. It doesn’t run all the time, only when needed.
Stage One (Low Speed) activates around 220°F or when the A/C is turned on. It uses a fan resistor to reduce voltage and run the motor at lower speed.
Stage Two (High Speed) kicks in at 230°F to cool the engine rapidly. It bypasses the resistor and delivers full 12V power.
If the fan doesn’t run at all or only runs on high speed, you’re missing critical cooling during low-load conditions like idling or slow traffic.
DME Controls Fan Activation (2008+ Models)
In 2008 and newer Mini Coopers, the Engine Control Module (DME) controls the fan by sending a ground signal, not power.
The DME grounds Pin 13 of relay K21. This activates the relay, allowing power from Fuse 08 to reach the fan motor via the red wire. If the DME doesn’t send the ground due to a bad sensor or software issue, the fan won’t turn on even if everything else is working.
Check the Fan Relays First
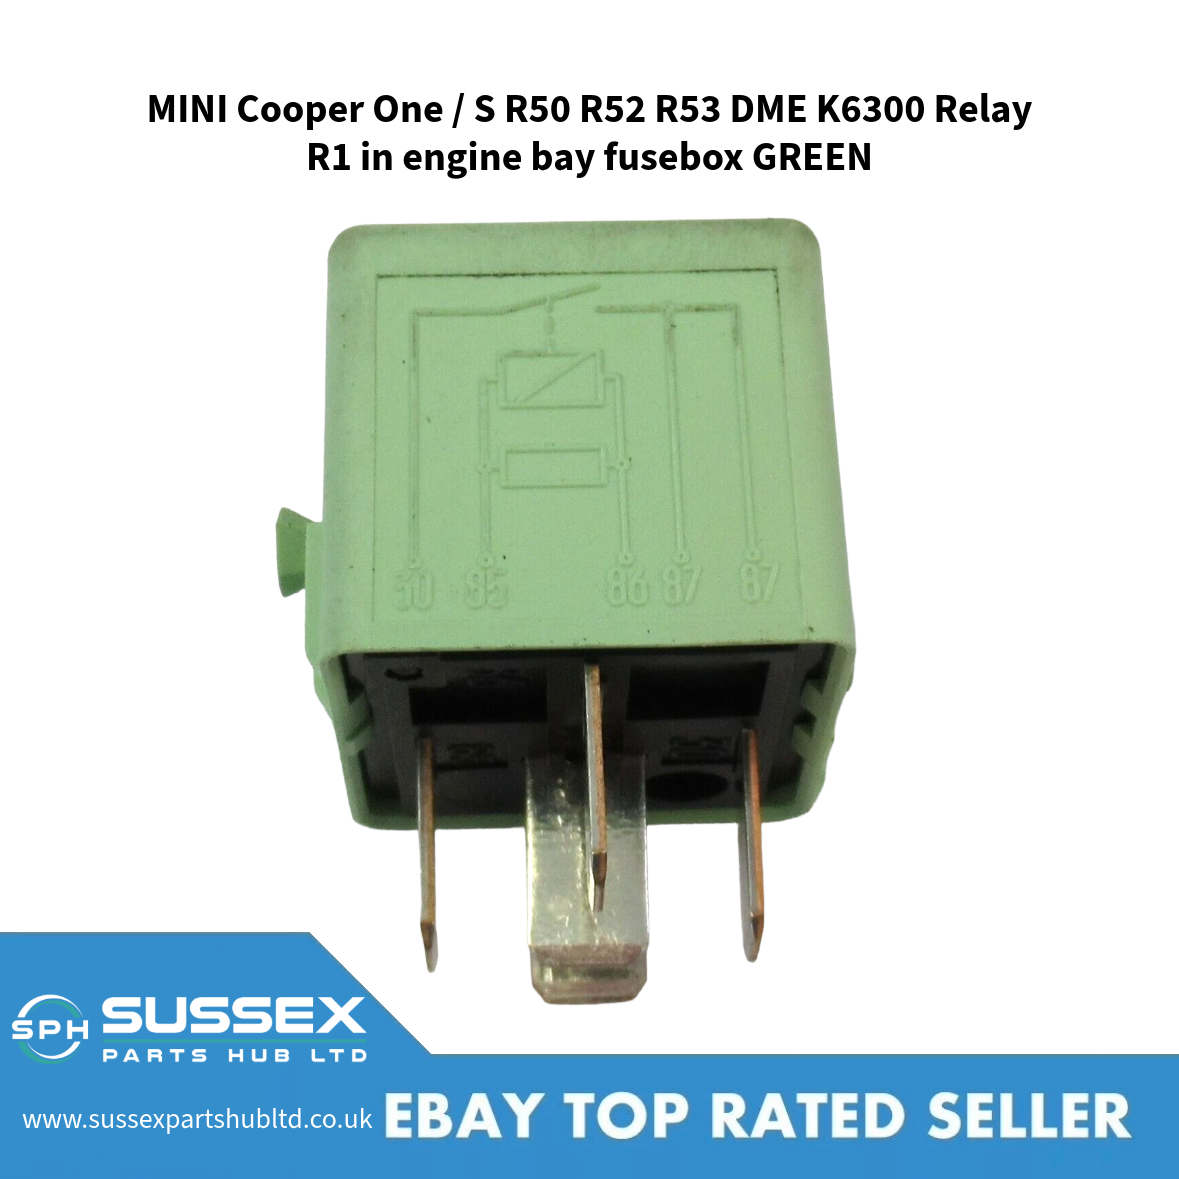
Mini Cooper Relay Pinout Is Unique
The most common mistake is assuming the relays are standard. They’re not.
Pin 30 (power in) and Pin 87 (power out) are in opposite corners. Pin 86 (coil power) and Pin 85 (coil ground) are also diagonally placed. Pin 87a is unused and left open.
A relay that fits physically may not work electrically if the pin layout doesn’t match. Always compare the old relay to the new one before installing.
Test or Swap the Relays
Use this quick method to isolate relay failure.
- Locate the two fan relays in the under-hood fuse box.
- Swap Relay 1 (Low Speed) with Relay 2 (High Speed).
- Turn the ignition on and activate the A/C.
If the fan now runs on low speed but not high, the original low-speed relay was bad. If the problem stays with the speed stage, the issue is not the relay. It’s the resistor, wiring, or motor.
Pro Tip: Use a relay tester or multimeter to check coil continuity and contact closure. A clicking sound doesn’t guarantee electrical function.
Diagnose the Low-Speed Fan Resistor

Why the Resistor Fails
The low-speed fan resistor is the number one failure point, especially in R50, R53, and 2007 to 2008 models.
It’s located on top of the radiator or inside the fan shroud. The component is exposed to heat, coolant, and vibration. Over time, the internal filament cracks or breaks, killing low-speed operation.
Symptoms of a Bad Resistor
The fan runs on high speed only. The engine overheats in traffic or when A/C is on. There’s no fan noise when A/C compressor engages.
Visual Clue: Remove the shroud and inspect the resistor. Look for cracks, discoloration, or broken wires.
Can You Replace Just the Resistor
Yes, if the housing and wiring are intact.
Mini often recommends replacing the entire fan assembly, but a standalone resistor replacement is cheaper and effective. If the connector is melted or wires are brittle, replace the full assembly to avoid repeat failures.
Test the Fan Motor Directly
Bypass the System with 12V Power
If relays and resistors check out, test the motor itself.
- Disconnect the fan motor connector.
- Use jumper wires to apply 12V from a battery charger or jump starter.
- Connect the red wire to positive for high speed. Connect the second wire (often black/white) to positive for low speed via the resistor path.
If the fan spins on both connections, the motor is good and the problem is in the control circuit. If it doesn’t spin at all, the motor is dead and needs replacement.
Warning: Never reverse polarity. It can damage the motor or electronics.
Check Coolant Temperature Sensor
Sensor Failure Tricks the DME
A faulty coolant temperature sensor can prevent the DME from sending the ground signal.
It may read cold when the engine is hot. The result is no fan activation even at 230°F.
How to Test the Sensor
- Use an OBD2 scanner to read live coolant temperature.
- Compare it to actual conditions. Hot engine, boiling coolant, but scanner reads 190°F? The sensor is faulty.
- Perform a resistance check across the sensor terminals. Compare readings to factory specs at different temperatures.
Fix: Replace the sensor if readings are out of range. It’s usually located near the thermostat housing.
Verify DME Ground Signal (2008+ Models)
Is the Brain Sending the Command
For 2008 and newer models, confirm the DME is doing its job.
- Locate Pin 13 on relay K21.
- Back-probe with a multimeter set to continuity or voltage.
- Run the engine until it reaches 220°F+.
- Check for a ground signal on Pin 13 when the fan should activate.
No ground? The DME isn’t triggering the relay. Possible causes include bad sensor input, software glitch, or wiring break.
Quick Field Test: Force the Ground
- Find X2013 connector at the bottom of the fuse panel.
- Ground Pin 11 with a jumper wire.
- Turn ignition on.
If the fan spins, the relay, motor, and power supply are good. The issue is upstream. The DME isn’t sending signal due to sensor or logic fault.
Use a Scan Tool to Command the Fan
Professional-Level Diagnosis at Home
With a compatible OBD2 scan tool, you can force the fan to run.
- Connect the scanner.
- Navigate to Actuation Tests or Output Controls.
- Select Radiator Fan Stage 1 and Radiator Fan Stage 2.
- Command each stage.
If the fan runs when commanded, the system is functional. It just isn’t getting the right trigger. If it doesn’t run, the issue is electrical or mechanical.
Budget Option: Use Torque Pro with an OBD2 dongle to monitor coolant temp and check for related codes like P0128 or P0480.
Inspect Wiring and Connectors
Hidden Breaks and Corrosion
Even if components test good, wiring issues can kill fan operation.
A common problem is wires that look fine but are broken inside the insulation. The location is near the resistor connector where heat and vibration weaken the strands.
Perform a Wiggle Test
- Turn ignition on.
- Gently wiggle the fan harness, especially near the resistor.
- Watch for intermittent fan start-up.
If the fan kicks on when wiggled, you’ve found a broken wire or loose connection. Repair by splicing in new wire or replacing the harness section.
Also check for corroded pins in connectors, loose seating, and burnt or melted insulation.
A/C System Affects Fan Operation
Fan Won’t Run If A/C Is Low
The Mini Cooper links fan operation to A/C demand.
Stage One should activate whenever A/C is on. But if the refrigerant is low, the pressure switch won’t close the circuit.
How to Verify A/C Function
- Turn A/C to max cold.
- Feel the air from the vents. It should be approximately 43°F.
- Check for compressor engagement. RPM drops when A/C is turned on.
Critical: A system that loses refrigerant quickly after regassing likely has a condenser leak, a common failure point in front-end impacts.
Step-by-Step Fan Shroud Removal

Access the Resistor and Motor
To replace the resistor or fan assembly, you’ll need to remove the shroud.
- Remove the bumper skin by unscrewing fasteners around the grille and wheel arches. Gently pull the bumper forward.
- Detach the front frame by removing bolts from the subframe rails. Tap with a rubber mallet if stuck.
- Drain and disconnect radiator hoses. Loosen clamps and drain coolant into a container.
- Release shroud clips by removing screws at top corners. Push tabs on clip backs to release.
- Tilt and remove radiator and shroud as a unit.
Pro Tip: Check for rubber alignment caps on subframe ends. If missing, the shroud won’t seat properly on reassembly.
Reassembly Best Practices
Avoid Costly Comebacks
After repair, reassembly matters.
Replace rubber alignment caps if missing. They ensure proper shroud positioning. Tap shroud gently with a hammer to seat it fully. Double-check connectors, especially the low-speed resistor plug and fan motor connector. Ensure they’re fully locked.
Refill and bleed the coolant system. Air pockets cause false temp readings and prevent fan activation. Run the engine with the radiator cap off until flow is steady and no bubbles appear.
Model-Specific Tips
R50/R53 (2001-2008)
The resistor is inside the radiator top, exposed to coolant. Common failure after 10 years. Replace the resistor early if you own a high-mileage example.
R56 (2007-2013)
There’s no dashboard temp gauge. Use an OBD2 app to monitor temps. Fan Stage One is tied closely to A/C charge. DME control starts here, so check the ground signal on Pin 13.
2007-2008 Transition Models
These mix of old and new systems. Fuse 08 powers the fan circuit, so always check it first. X2013 connector is key for testing the DME signal.
Troubleshooting Flow: What to Do Now
Fan Never Runs
- Check Fuse 08 under the hood.
- Swap fan relays.
- Test motor with direct 12V.
- Verify DME ground signal on Pin 13.
Fan Runs High, Not Low
- Inspect low-speed resistor.
- Test low-speed relay.
- Check connector seating and wiring.
Fan Doesn’t Run with A/C
- Confirm A/C is cooling at the outlet.
- Check refrigerant pressure.
- Test pressure switch and wiring.
Frequently Asked Questions About Mini Cooper Fan Not Turning On
Why does my Mini Cooper fan only run on high speed?
This typically indicates a failed low-speed fan resistor. The resistor reduces voltage for Stage One operation. When it fails, only the high-speed relay can activate the fan. Inspect the resistor for cracks or discoloration, or test by swapping the low-speed relay with the high-speed relay.
Can I drive my Mini Cooper if the fan isn’t working?
Driving without a working radiator fan is risky, especially in traffic or hot weather. The engine can overheat quickly, potentially causing severe damage like a blown head gasket. If the fan fails, limit driving, monitor coolant temperature, and repair immediately.
How much does it cost to replace the Mini Cooper fan resistor?
A standalone resistor typically costs $30 to $100, depending on your model year. Labor adds another $100 to $200 if done professionally. If the wiring harness is damaged, replacing the entire fan assembly costs $300 to $600.
Where is the fan resistor located on a Mini Cooper?
On R50 and R53 models, the resistor is integrated into the top of the radiator. On R56 models, it’s usually inside the fan shroud assembly. Access typically requires removing the front bumper and shroud.
Why won’t my Mini Cooper fan turn on even after replacing the relay?
If replacing the relay doesn’t fix the issue, test the fan motor with direct 12V power. If the motor spins, the problem is upstream in the control circuit. Check the coolant temperature sensor, DME ground signal, and wiring connectors for breaks or corrosion.
Do I need a special scan tool to diagnose Mini Cooper fan issues?
A basic OBD2 scanner can read coolant temperature and check for relevant trouble codes. For advanced diagnosis like commanding fan stages or checking DME ground signals, a BMW-specific scan tool provides deeper access. Torque Pro with a Bluetooth OBD2 dongle works well for basic monitoring.
Key Takeaways for Fixing Your Mini Cooper Fan
The Mini Cooper fan not turning on is rarely a mystery. It’s usually the low-speed resistor, a misplaced relay, or a bad connection. Always check the non-standard relay pinout first, as many misdiagnosed failures stem from using standard automotive relays instead of Mini-specific ones.
The low-speed resistor is the most common failure point, especially in models over 10 years old. Before replacing expensive components, test the motor directly with 12V power to confirm whether the issue is mechanical or electrical. For 2008 and newer models, verify the DME ground signal on Pin 13 before condemning the motor or wiring.
For older high-mileage Mini Coopers, consider replacing the entire fan assembly proactively during repair. This eliminates the risk of repeat failures from degraded wiring and connectors. Follow the reassembly steps carefully, especially when it comes to rubber alignment caps and bleeding the cooling system.