How to Fix Portable Ice Maker Fan Not Working
Is your portable ice maker fan not working? You’re not alone. A non-functional fan is one of the most common and critical failures in portable ice makers. Without proper airflow, the compressor overheats, cooling fails, and ice production stops completely. The good news? Most fan issues can be diagnosed and fixed quickly, often in under 30 minutes. Whether you own a Whynter, Keurig, Danby, Frigidaire, or Black+Decker model, this guide covers the exact steps to get your fan spinning again.
This article walks you through the top causes of fan failure, how to test voltage and motor function, and what to do when water leaks or electrical faults are to blame. You’ll also learn how to prevent repeat failures and extend your machine’s life by 2 to 3 years with simple maintenance.
Diagnose Fan Failure Fast

Check for Obvious Blockages
Start with a visual inspection. Dust, lint, or ice chunks can jam the fan blades. Unplug the unit and remove the back panel. Look at the fan near the compressor, which is usually a small 12V DC motor with plastic blades.
If blades are stuck, gently twist them by hand. If they feel stiff or unmovable, the motor bearings may be seized or rusted. If blades feel loose or wobbly, the shaft could be damaged.
Use a soft brush or compressed air to clean debris. Never force the blades. If they will not spin freely, the issue is likely mechanical or electrical.
A fan that “jolts” but will not sustain rotation usually has power but lacks torque, pointing to low voltage or motor wear.
Test Fan Manually
With the unit unplugged, spin the fan blades by hand. If they spin freely, the mechanical health is good and the problem is likely electrical. If they feel stiff or seized, the bearings are worn, the shaft is rusted, or water damage has occurred.
If the fan spins freely but still does not run when powered, move to voltage testing.
Confirm 12V Power Supply
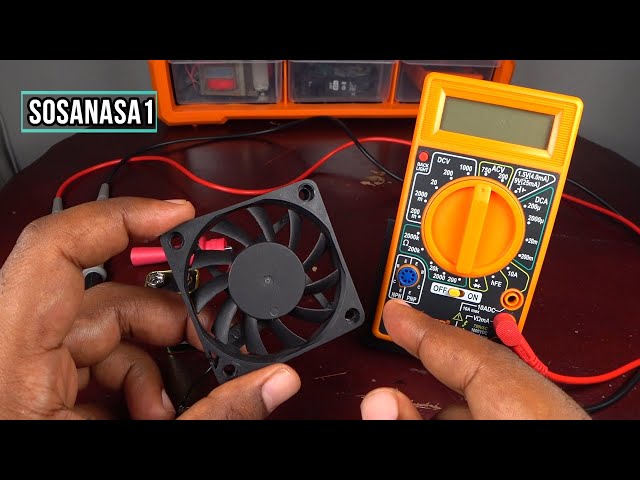
Measure Voltage at Fan Wires
Most portable ice makers use 12V DC fans. A drop below 10V prevents startup. You will need a digital multimeter for this test.
Set the multimeter to DC voltage. Plug in the ice maker and start a cycle. Touch the red probe to the fan red wire and the black probe to the black wire or chassis ground.
The expected reading is 12V DC when the fan should be running. No voltage indicates the issue is upstream, possibly the control board, lid switch, or transformer. Voltage drops when the fan jolts indicate a power supply failure or short circuit. If 12V is present but the fan is dead, replace the fan motor.
Always verify voltage during operation. Some boards only power the fan during specific cycle phases.
Fix Water Leaks Before Replacing Fan

Locate Ruptured Tubing
Water leaks are the number one cause of repeat fan failure. A common weak point is the 1/8 inch inner diameter tube that carries water to the cooling rods.
Inspect for cracks or bulges in tubing. Look for mineral buildup around connections. Check for water pooling near the fan or control board.
If the fan motor or circuit board shows corrosion, which appears as white or green residue, water intrusion is confirmed.
Replace the tubing before installing a new fan. Otherwise, the new fan will fail in under two months.
Replace Damaged Water Lines
Unplug and drain the unit. Disconnect old tubing from the reservoir and pump. Cut new 1/8 inch inner diameter tubing to length. Reconnect securely, ensuring no kinks.
Use food-grade vinyl or silicone tubing. Avoid generic hoses because they degrade faster.
Wrap connections with electrical tape for extra security, but do not block flow.
Replace Faulty Fan Motor
Install Correct 12V Fan
A common replacement model is the PY-1225H12S, which fits Frigidaire, Whynter, Keurig, and Danby units.
Unplug the unit. Remove back panel screws. Disconnect old fan wires, noting polarity where red is positive and black is negative. Unscrew mounting brackets. Install the new fan, ensuring airflow direction matches the original, blowing toward the compressor. Reconnect wires and reassemble.
Power on and verify strong, continuous airflow.
Some fans have a third wire for tachometer or speed sensor. If your model has it, ensure the new fan supports it or bypass it per manufacturer specs.
Troubleshoot Related Failures

Test Limit Switches
Faulty limit switches can disable the fan or cooling cycle. There are two key switches. The lower switch on the left controls water fill and ejection. The upper switch on the right detects tray position.
Use a multimeter in continuity mode to diagnose stuck switches.
| Switch | Lever Position | Expected Result |
|---|---|---|
| Lower | Retracted (bucket down) | No beep (open) |
| Lower | Pressed (bucket up) | Beep (closed) |
| Upper | Retracted | No beep |
| Upper | Pressed | Beep |
If a switch beeps when retracted, it is stuck closed and needs replacement.
Replace both switches at once. They wear evenly, and replacing only one invites another failure in weeks.
Inspect Ice Full Sensor
A false “Ice Full” signal can halt the entire cycle, including the fan. Symptoms include the “Ice Full” light coming on with an empty bin and no cooling or fan activity.
The cause is often a failed infrared LED, which is usually on the right side, or corroded wires.
Check the LED, which is often salvaged from old TV remotes. Clean corroded sensor tips. Resolder loose connections.
Press and hold the Select button for 10 seconds to override the sensor. Warning: the machine will not stop when full.
Rule Out Compressor Overload
If the fan runs but no cooling occurs, the compressor may be overheated. The overload protector could be tripped due to prior fan failure.
Listen for a faint hum from the compressor. No sound indicates to check the overload relay or start capacitor. Clicks but no start means a failed compressor, which requires professional repair.
Compressor and refrigerant repairs require EPA certification. Do not open sealed systems.
Prevent Future Fan Failures
Clean Condenser Coils Monthly
Dirty coils cause overheating and fan strain. Unplug the unit. Use a soft brush or toothbrush. Gently clean coils near the compressor. Blow out dust with compressed air.
Do this every 1 to 2 months, or every 6 months in low-dust areas.
Clean fan blades at the same time to prevent imbalance and wear.
Ensure Proper Ventilation
Place the ice maker on a flat, stable surface. Keep at least 4 inches from walls. Keep away from heat sources like ovens and sunlight.
Never enclose the unit in a cabinet. Restricted airflow kills fans.
Use Surge Protection
Voltage spikes fry control boards. Plug into a surge protector, not a direct outlet. This prevents premature board failure, erratic fan behavior, and random shutdowns.
When to Repair vs. Replace
Repair If
Fan or limit switches are faulty, costing $5 to $15. The water leak is fixable. You are comfortable with basic tools and a multimeter. The unit is less than 3 to 4 years old.
Time required is 15 to 60 minutes.
Replace If
The compressor is dead. Refrigerant is leaking. The control board is burnt. Repairs exceed $50 in parts.
New units start at $120, and repairing often saves 60 to 80%.
Final Checks After Repair
Power on and listen for fan startup within 30 seconds. Verify airflow by placing your hand near the vent. Monitor temperature; the compressor should stay cool. Check the ice cycle; the first batch may take longer, and quality improves after 2 to 3 cycles.
A 7-minute cycle with solid ice cubes means the system is balanced.
Frequently Asked Questions About Portable Ice Maker Fan Not Working
Why does my portable ice maker fan stop working?
The fan can stop working due to dust buildup blocking the blades, water damage from leaks causing corrosion, low voltage from a failing power supply, or worn motor bearings. Identifying the root cause is essential for a proper fix.
How do I test if my ice maker fan is getting power?
Use a digital multimeter set to DC voltage. With the unit running, touch the probes to the fan’s red and black wires. You should read 12V DC. No reading means the issue is upstream. Low reading means a power supply problem.
Can a water leak really cause fan failure?
Yes. Water leaks from ruptured tubing drip onto the fan motor or circuit board, causing corrosion and short circuits. This is why replacing the tubing before installing a new fan is critical.
What happens if I run my ice maker without a working fan?
Without the fan, the compressor overheats because it cannot dissipate heat. This triggers the overload protector, stops cooling, and can permanently damage the compressor. Running the unit without a fan risks costly repairs.
How often should I clean my ice maker to prevent fan failure?
Clean the condenser coils and fan every 1 to 2 months. Inspect water tubing for cracks every 3 to 6 months. Monthly vinegar cycles help prevent mineral buildup that can lead to leaks.
Key Takeaways for Fixing Your Portable Ice Maker Fan
A portable ice maker fan not working is rarely a death sentence. In 90% of cases, the fix is simple: clean a blockage, test voltage, replace a $10 fan, or stop a water leak. Start by checking for debris and testing the fan manually, then measure 12V power to confirm the supply is working. Address water leaks immediately because they cause repeat failures and destroy new replacement fans. Replace both limit switches at the same time to prevent one from failing shortly after the other. Stay proactive with monthly cleaning, proper ventilation, and surge protection to extend your machine’s life to 5 or more years. Your ice maker will reward you with years of cold, clear cubes on demand.